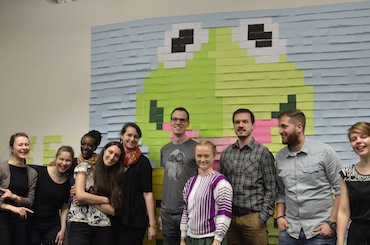
No animal was harmed in this, we promise :) Nevertheless, we indeed ended up with a frog on the wall in the Meltwater office in Berlin.
In Berlin we have a team that uses Kermit, the well known Muppet character, as a mascot. So we thought it would be only appropriate to decorate the office accordingly.
Our team had a lot of fun doing this, as you can see in the video. Therefore we wrote a tutorial, so that you can produce Post-it art of your own.
Have fun, and please share your own Post-it art with us!
Tutorial for Creating Post-it Art
Step 1: Pick a wall
- Decide on which wall you want to show your artwork. Then measure the space that you have available
- Measure width and height of the Post-its that you want to use
- Based on these two measures, you can calculate the width and height in pixels that you have available in total
Step 2: Find a Motive

Not every picture is suitable for Post-it art. Consider the following before making your choice:
- Pixelated art is a perfect match e.g. old school videogames.
- Search pictures with high contrast. Gradients are difficult.
- What colors does it have? Post-its have a limited spectrum.
- How big do you want it to be? Small size means less detail.
Step 3: Rasterizing

After selecting the perfect motive, you need to convert it into pixels. If your picture is already pixelated, you can simply measure and divide. For a photograph you need to pixelate it yourself:
- Open your photo in an editing tool of your choice (e.g. Photoshop)
- Crop the area that you want to pixelate
- Shrink the cropped image to around 10% of its original size.
- Resize it back to 100%
- Note for Photoshop users: You need to apply “Nearest Neighbor Image Interpolation” in Settings > General. This will prevent Anti Aliasing when you resize it back to 100%.
- If this does not work, simply take a snapshot of your desktop while transformation is active (CMD+Shift+3 on Mac). It should always be pixelated in transform mode.
Step 4: Convert Pixels into Post-its

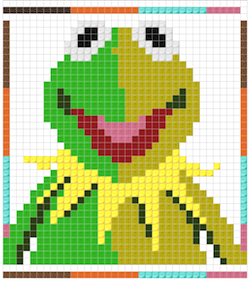
Now that you have a good template to translate into Post-it, you need a version of your image that has a very limited color spectrum, so that you can build it with Post-its.
You can either do this manually, or use tools like postitwar.me. Here it is easy to apply size and colors to your artwork.
Once you are done, print out multiple copies of the resulting template.
Step 5: Happy Taping

Get enough Post-its in different colors. If you cannot find the colors that you need, get sheets of paper in that color, and cut out squares in the same size as your Post-its.
Then you gather your team, and start taping the Post-its to the wall, following the template. You want to make sure that you start from a horizontal line at the bottom of your wall, so that your resulting image is straight.
Also don’t forget to have your camera ready while doing this :)
Happy taping!